Lumbar Pain and Referral Patterns A Comprehensive Clinical Guide to Dermatomes, Radiculopathy, Referred Pain, MRI Limitations, and Diagnostic Precision
Pain Spa Clinical Education Series
Lumbar Pain and Referral Patterns
A Comprehensive Clinical Guide to Dermatomes, Radiculopathy, Referred Pain, MRI Limitations, and Diagnostic Precision
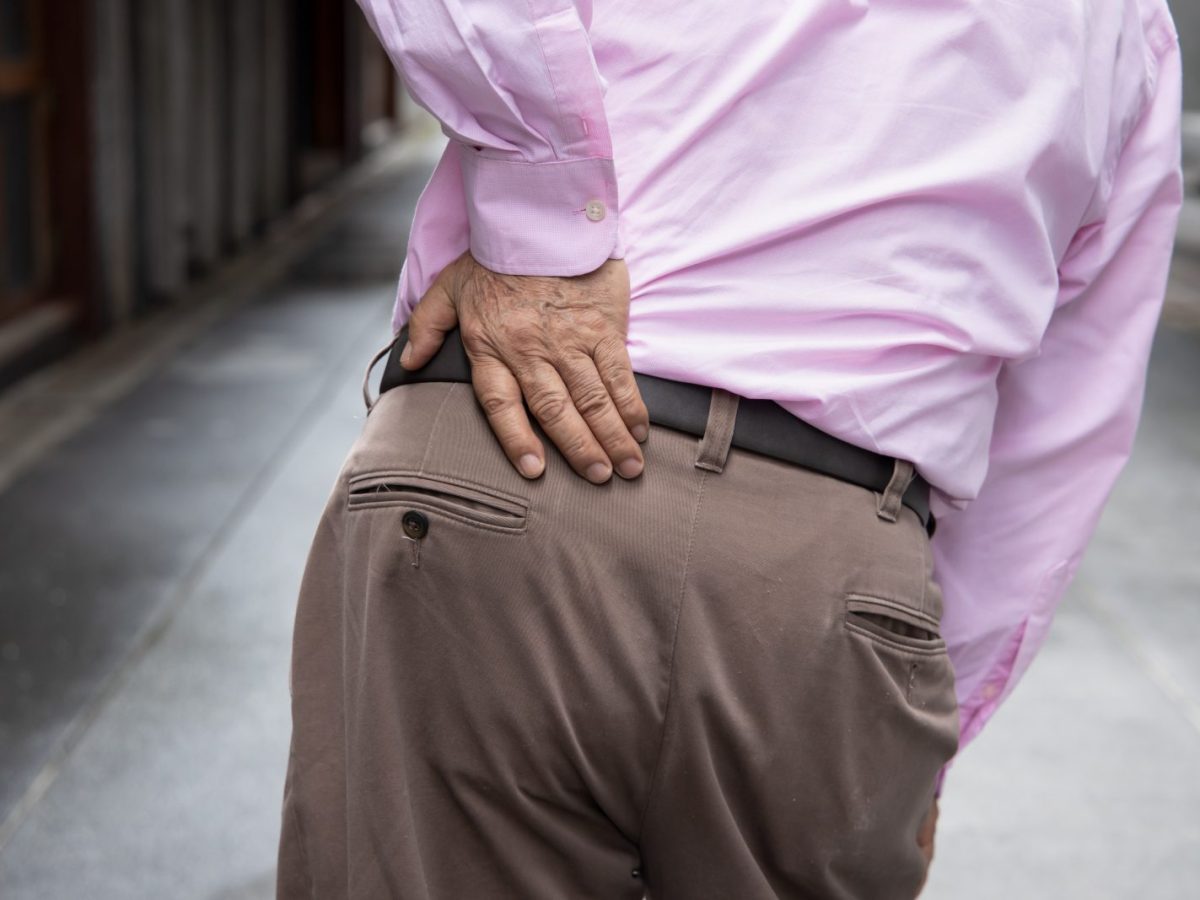
Pain arising from the lumbar spine is frequently mislocalised, with symptoms often felt in the buttock, groin, thigh, knee, calf, or foot rather than directly over the true pain generator. This clinician-focused review explores lumbar dermatomal, myotomal, sclerotomal, facet, sacroiliac, and peripheral nerve referral patterns, alongside practical examination findings, imaging limitations, and precision diagnostic strategies.
Pain Spa | Dr M. Krishna | Specialist Interventional Pain Management
Introduction: Why Lumbar Pain Is Often Misunderstood
Lumbar pain is one of the commonest reasons for medical consultation, imaging, and specialist referral, yet it is frequently misunderstood. A major clinical error is assuming that the site of pain reliably identifies the structure causing it. In practice, lumbar pain often behaves poorly as a localisation tool. Patients may report pain in the buttock, groin, thigh, knee, calf, shin, or foot even when the primary source lies elsewhere in the lumbar spine or pelvic girdle.
Pain Location Does Not Always Equal Pain Source
Pain from lumbar structures is commonly referred rather than truly local. Shared segmental innervation and convergence within the spinal cord mean that symptoms may be felt at a distance from the true pain generator.
- L5 radiculopathy may present mainly as buttock or lateral hip pain
- Facet joint pain may radiate into the thigh and be mistaken for sciatica
- Sacroiliac joint pain may cause buttock, groin, or posterior thigh pain
- L2–L3 radiculopathy may present as groin, anterior thigh, or medial knee pain
- Superior cluneal nerve irritation may cause iliac crest or upper buttock pain
Why Different Structures Mimic Each Other
| Structure | Common Referral Pattern |
|---|---|
| Disc / nerve root | Buttock, leg, calf, foot |
| Facet joints | Low back, buttock, thigh |
| Sacroiliac joint | PSIS, buttock, groin, thigh |
| Iliolumbar ligament | Iliac crest, flank, PSIS |
| Muscles / myofascial pain | Lumbar, gluteal, thigh |
| Cluneal nerves | Iliac crest, upper buttock |
| Hip joint | Groin, thigh, buttock |
Why Precise Diagnosis Matters
Because symptoms overlap, treatment based on pain location alone often fails. A technically perfect injection into the wrong structure remains the wrong treatment.
- History and pain behaviour
- Neurological examination
- Movement testing
- Imaging correlation
- Diagnostic injections where appropriate
Key Message
In lumbar medicine, where pain is felt does not always equal where pain starts. Effective management depends on identifying the true pain generator rather than treating symptoms based purely on location alone.
Understanding Dermatomes, Myotomes, and Sclerotomes
Accurate assessment of lumbar pain requires more than simply asking where symptoms are felt. Clinicians must understand how spinal nerve roots relate to sensory territories (dermatomes), motor function (myotomes), and deep somatic referral patterns (sclerotomes). These concepts remain highly useful in practice, but modern evidence shows they are more variable and less anatomically tidy than traditional textbook diagrams suggest.
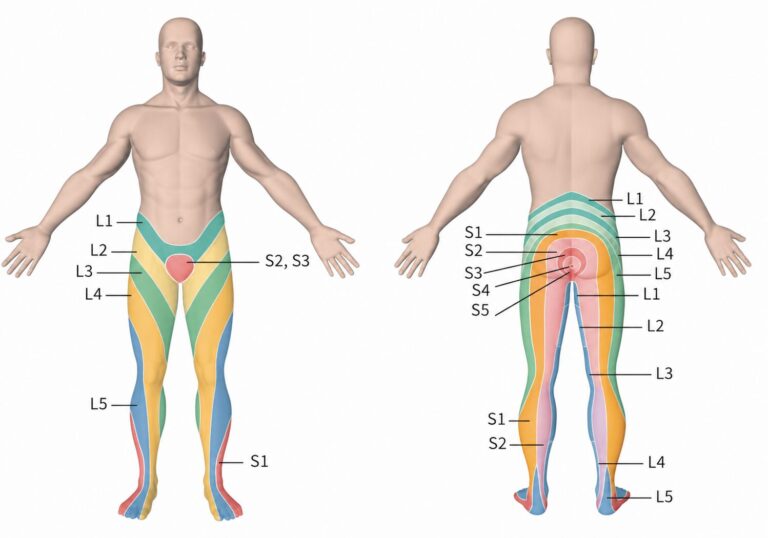
What Is a Dermatome?
A dermatome is an area of skin predominantly supplied by sensory fibres from a single spinal nerve root. In lumbar medicine, dermatomes help interpret numbness, paraesthesia, burning pain, or altered sensation in the leg.
| Root Level | Typical Sensory Territory |
|---|---|
| L2 | Anterior thigh |
| L3 | Anterior thigh to medial knee |
| L4 | Medial leg / medial malleolus |
| L5 | Dorsum of foot / first web space |
| S1 | Lateral foot / sole |
Adjacent dermatomes overlap substantially, so true sensory deficits are often less sharply defined than classic maps imply.
What Is a Myotome?
A myotome refers to the group of muscles predominantly supplied by motor fibres from a particular spinal nerve root. Myotomes are especially valuable when assessing weakness in radiculopathy.
| Root Level | Typical Movement Tested |
|---|---|
| L2 | Hip flexion |
| L3 | Knee extension |
| L4 | Ankle dorsiflexion |
| L5 | Great toe extension / hip abduction |
| S1 | Plantarflexion |
Most muscles receive input from more than one nerve root, so weakness patterns are rarely absolute.
What Is a Sclerotome?
A sclerotome describes deep somatic structures innervated segmentally, including bone, periosteum, ligaments, fascia, annulus fibrosus, and joint capsules. Clinically, the term is used to explain deep aching referral pain that does not follow a dermatomal pattern.
- Lumbar facet joint pain referring into the buttock or thigh
- Iliolumbar ligament pain referring to the PSIS or iliac crest
- Discogenic pain referring to the buttock or groin
- Vertebral endplate pain causing deep axial pain with diffuse spread
Sclerotomal pain is typically dull, aching, deep, poorly localised, and often difficult for patients to map clearly.
Why Traditional Maps Are Helpful but Imperfect
- Significant overlap exists between adjacent dermatomes
- Many muscles have dual or multi-root innervation
- Individuals vary considerably from textbook norms
- Provoked radicular pain often deviates from neat dermatomal lines
- Pain may reflect irritation rather than fixed compression
Studies of transforaminal nerve root provocation found that L3–S1 irritation often produced buttock, posterior thigh, and calf pain regardless of exact level.
Why Modern Pain Patterns Are More Complex Than Textbook Diagrams
Real patients frequently present with mixed mechanisms rather than isolated lesions. A patient may simultaneously have mild radiculopathy, facet arthropathy, sacroiliac dysfunction, gluteal myofascial pain, and sensitisation from prolonged symptoms.
- Chemical radiculitis without major compression
- Dynamic positional stenosis
- Convergent dorsal horn processing
- Peripheral nerve sensitisation
- Previous surgery or chronic pain neuroplasticity
Key Message
Dermatomes, myotomes, and sclerotomes should be viewed as clinical frameworks rather than rigid rules. They are most powerful when integrated with examination findings, imaging correlation, pain behaviour, and targeted diagnostic procedures.
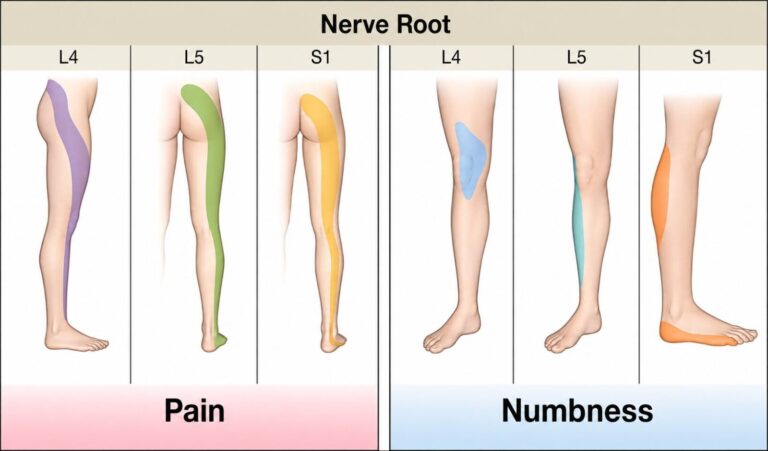
Lumbar Radicular Pain: Dermatomal and Myotomal Referral Patterns (L1–L5)
Overview Table: Dermatomal Referral Patterns by Level
Lumbar radicular pain may follow recognisable sensory distributions, but real-world presentations often extend beyond neat textbook dermatome maps. Pain may be influenced by root irritation, inflammation, overlap between adjacent roots, and individual anatomical variability. The table below provides a clinically useful framework for common referral patterns.
| Root Level | Typical Dermatomal Distribution | Key Sensory Area | Typical Pain Quality |
|---|---|---|---|
| L1 | Back, groin, inguinal canal, pelvis, upper inner thigh, scrotum / labia majora | Groin crease / inguinal region | Aching, burning, diffuse |
| L2 | Back and front of thigh from below the inguinal canal to the knee; may include lateral hip | Anterior mid-thigh | Deep aching, dysaesthesia, anterior thigh pain |
| L3 | Back, upper buttock, anterior thigh, knee, proximal medial lower leg | Medial knee joint — highly specific | Aching or burning around medial knee |
| L4 | Medial buttock, lateral thigh, medial leg, dorsum of foot, first toe, medial malleolus | Medial malleolus / medial foot | Sharp, shooting into anterolateral thigh and medial foot |
| L5 | Buttock, posterior / lateral thigh, lateral leg, dorsum of foot including first to fourth toes | Dorsum of foot / first web space | Sharp, burning into dorsolateral leg and dorsal foot |
Overview Table: Myotomal Involvement and Reflex Changes
Motor findings often localise lumbar radiculopathy more accurately than pain distribution alone. Weakness patterns, gait changes, and reflex abnormalities are particularly valuable when symptoms are anatomically unclear.
| Root Level | Principal Muscles | Best Clinical Test | Functional Clue | Reflex Findings | How to Test Reflex |
|---|---|---|---|---|---|
| L1 | Iliopsoas partial contribution, lower abdominal wall contribution | Hip flexion | Difficulty initiating hip lift | Cremasteric / Geigel reflex rarely tested | Stroke inner thigh; observe ipsilateral testicular elevation or lower abdominal contraction |
| L2 | Iliopsoas, sartorius, adductors | Hip flexion against resistance | Trouble climbing stairs / rising from chair | Adductor or mild patellar change | Tap medial femoral condyle for adductor reflex; tap patellar tendon with knee flexed for patellar reflex |
| L3 | Quadriceps femoris | Knee extension / sit-to-stand | Knee instability, difficulty rising | Patellar reflex commonly reduced | Tap patellar tendon with knee flexed |
| L4 | Tibialis anterior, quadriceps contribution | Ankle dorsiflexion / heel walking | Foot slap, weak heel walk | Patellar reflex reduced; useful localising sign | Tap patellar tendon with knee flexed |
| L5 | Extensor hallucis longus, tibialis anterior, gluteus medius, extensor digitorum | Great toe extension + hip abduction | Foot drop, Trendelenburg gait | No reliable reflex; semimembranosus / medial hamstring reflex variable | Tap medial hamstring tendon with the knee slightly flexed |
L1 Nerve Root – Key Clinical Notes
L1 radiculopathy is relatively uncommon and may present with groin, pelvic, inguinal, or upper inner thigh pain. Symptoms are frequently mistaken for hip, abdominal, pelvic, or genitourinary pathology. Weakness is often subtle, with only minor hip flexion involvement.
Clinical pearl: Groin pain is not always generated by the hip or pelvis.
L2 Nerve Root – Key Clinical Notes
L2 radiculopathy commonly causes anterior thigh pain and may include lateral hip discomfort. Sensory change may be patchy. Hip flexion weakness can present as difficulty climbing stairs, getting out of a chair, or walking uphill.
Common mimics:
- Hip osteoarthritis
- Femoral neuropathy
- Iliopsoas pathology
- Meralgia paraesthetica
Clinical pearl: Anterior thigh pain with subtle hip flexion weakness should prompt lumbar consideration.
L3 Nerve Root – Key Clinical Notes
L3 radiculopathy often affects the anterior thigh, medial knee, and proximal medial shin. Medial knee pain or numbness is a particularly valuable clue and may mimic primary knee pathology.
Quadriceps weakness may produce:
- Difficulty standing from sitting
- Knee giving way
- Stair climbing problems
Patellar reflex reduction is common. Clinical pearl: Medial knee pain is not always a knee disorder.
L4 Nerve Root – Key Clinical Notes
L4 radiculopathy commonly causes pain in the anterolateral thigh, medial leg, medial ankle, or medial foot. The medial malleolus is an important sensory landmark.
Weakness may include:
- Reduced ankle dorsiflexion
- Difficulty heel walking
- Subtle quadriceps involvement
Common mimics:
- Hip disease
- Knee pathology
- Femoral neuropathy
- Peripheral neuropathy
Patellar reflex loss strongly supports L4 involvement. Clinical pearl: Dorsiflexion weakness is not automatically L5.
L5 Nerve Root – Key Clinical Notes
L5 is one of the commonest affected roots. Pain often radiates through the buttock, lateral thigh, lateral leg, and dorsum of the foot.
Useful motor findings include:
- Great toe extension weakness
- Hip abductor weakness
- Dorsiflexion weakness
- Foot drop in severe cases
Common mimics:
- Common peroneal neuropathy
- Sciatic neuropathy
- Greater trochanteric pain syndrome
- Peripheral neuropathy
There is no consistently reliable L5 reflex. Clinical pearl: Great toe extension and hip abduction are often more useful than dorsiflexion alone.
Important Clinical Principles
Non-Dermatomal Patterns Are Common
Provoked nerve-root studies demonstrate that L3–S1 irritation may commonly produce:
Buttock → posterior thigh → posterior calf pain
This may occur regardless of the exact nerve root involved.
Upper Lumbar Radiculopathy Is Frequently Missed
L1–L3 pathology often mimics hip, groin, femoral nerve, or knee disorders and may have less obvious neurological findings than lower lumbar radiculopathy.
L4 vs L5 Requires Careful Examination
- L4: patellar reflex, quadriceps, medial ankle sensation
- L5: great toe extension, hip abduction, dorsum foot sensation
Myotomal Variability Exists
Modern stimulation studies suggest that root-level muscle innervation is broader and more variable than classic teaching implies. Examination should assess patterns rather than rely on a single isolated muscle.
Practical Bottom Line
Lumbar radiculopathy is most convincing when pain pattern, sensory loss, motor weakness, reflex change, and imaging findings align. No single dermatome chart or isolated weakness pattern should be used in isolation.
How to Differentiate L4 from L5 Radiculopathy
Differentiating L4 from L5 radiculopathy can be clinically challenging because there is overlap in both pain distribution and motor findings. The most important practical point is that ankle dorsiflexion weakness alone cannot reliably separate L4 from L5, because the tibialis anterior may receive contribution from both nerve roots.
Why Ankle Dorsiflexion Alone Is Not Enough
Traditional teaching often links ankle dorsiflexion weakness with either L4 or L5 involvement. In practice, this creates confusion. The tibialis anterior is commonly used as a dorsiflexion test, but it does not belong neatly to one root only.
| Finding | L4 | L5 |
|---|---|---|
| Tibialis anterior activation | Approximately 59.6% | Approximately 93.2% |
| Gluteus medius activation | Approximately 78.8% | Approximately 78.0% |
| Quadriceps / vastus medialis activation | Approximately 90.4% | Less typical |
| Gastrocnemius activation | Less typical | Approximately 83.1% |
This means dorsiflexion weakness may occur in either L4 or L5 radiculopathy, although it is more consistently seen with L5 involvement.
Key Differentiating Features
| Clinical Feature | L4 Radiculopathy | L5 Radiculopathy |
|---|---|---|
| Pain distribution | Anterolateral thigh, medial leg, medial ankle, medial foot | Buttock, dorsolateral thigh, lateral leg, dorsum of foot |
| Key sensory area | Medial ankle / medial malleolus | Dorsum of foot / 1st–2nd web space |
| Primary motor clue | Ankle dorsiflexion may be weak, but overlaps | Great toe extension weakness is more specific |
| Additional motor clue | Quadriceps weakness may support L4 | Hip abductor weakness supports L5 |
| Reflex | Patellar reflex reduced or absent | No reliable reflex; semimembranosus may be variable |
| Neurodynamic test | Femoral nerve stretch test more relevant | Straight leg raise more relevant |
| Common disc level | L3–L4 disc affecting L4 root | L4–L5 disc affecting L5 root |
Tibialis Anterior Overlap
The tibialis anterior is important, but it should not be over-interpreted. L4 can contribute to tibialis anterior function, while L5 activates it more consistently. Therefore, a weak heel walk or reduced ankle dorsiflexion should trigger a broader examination rather than an immediate assumption of L5 radiculopathy.
Great Toe Extension: The EHL Clue
The extensor hallucis longus is one of the most useful muscles for L5 assessment. Weakness of great toe extension is more specific for L5 than ankle dorsiflexion alone. Testing should be performed against resistance and compared side-to-side. A clear reduction in great toe extension, especially with dorsum foot sensory disturbance, strongly supports L5 involvement.
Hip Abductor Weakness
Hip abductor weakness is an important but often under-tested sign of L5 radiculopathy. The gluteus medius and tensor fascia lata should be assessed, particularly when symptoms are not clearly dermatomal.
- Difficulty maintaining pelvic stability
- Trendelenburg-type gait
- Lateral hip fatigue or weakness
- Reduced resisted hip abduction
Reflex Clues
Reflex testing is particularly helpful because L4 has a more useful reflex correlate than L5.
| Root | Reflex Clue | Interpretation |
|---|---|---|
| L4 | Patellar reflex reduced or absent | Supports L4 involvement |
| L5 | No consistently reliable reflex; semimembranosus may vary | Reflexes are less useful for confirming L5 |
A reduced patellar reflex, especially with medial ankle sensory change or quadriceps weakness, supports L4 rather than isolated L5 pathology.
Sensory Distribution Clues
Sensory testing should be done carefully because pain maps alone can mislead.
| Root | Most Useful Sensory Area |
|---|---|
| L4 | Medial ankle / medial malleolus / medial foot |
| L5 | Dorsum of foot / 1st–2nd web space |
Medial ankle sensory loss strongly supports L4 involvement, while dorsum foot or first web-space sensory change supports L5 involvement.
Practical Examination Strategy
| Suspect L4 When There Is | Suspect L5 When There Is |
|---|---|
|
|
Practical Bottom Line
Ankle dorsiflexion weakness alone is not enough to distinguish L4 from L5 radiculopathy. L4 assessment should emphasise medial ankle sensation, patellar reflex, and quadriceps strength. L5 assessment should emphasise great toe extension, hip abduction, dorsum foot sensation, and gait. The final diagnosis should integrate pain distribution, sensory findings, motor testing, reflexes, neurodynamic tests, and imaging correlation.
Clinical Examination for Lumbar Radiculopathy
Physical examination for lumbar radiculopathy should combine neurodynamic testing, motor testing, reflex assessment, sensory examination, gait assessment, and correlation with the history. No single test is definitive. The aim is not simply to find one positive sign, but to identify a consistent pattern that matches a plausible nerve root level.
The examination should also be level-specific. Femoral nerve stretch testing is more useful for upper lumbar radiculopathy (L2–L4), whereas the straight leg raise is more useful for lower lumbar radiculopathy (L4–S1).
Straight Leg Raise Test
| Feature | Detail |
|---|---|
| Technique | Patient supine. Raise the affected leg with the knee extended. |
| Positive test | Reproduction of the patient’s characteristic radicular pain, usually between 30–70° of hip flexion. |
| Best for | Lower lumbar radiculopathy, especially L4–S1. |
| Sensitivity | Approximately 90–92%. |
| Specificity | Low, approximately 10–40%. |
| Clinical value | Useful for ruling out radiculopathy when negative, but a positive test alone does not confirm the diagnosis. |
Adding ankle dorsiflexion at the end of the straight leg raise is known as the Bragard test. This increases neural tension and may improve sensitivity. SLR + Bragard in a parallel testing approach may reach a sensitivity of 97.4% with a negative predictive value of 96.6%.
Crossed Straight Leg Raise Test
| Feature | Detail |
|---|---|
| Technique | Raise the unaffected leg while the patient lies supine. |
| Positive test | Reproduction of sciatic or radicular pain in the opposite symptomatic leg. |
| Sensitivity | Approximately 22–35%. |
| Specificity | Approximately 90%. |
| Clinical value | A positive crossed SLR strongly supports clinically significant nerve root compression. |
Femoral Nerve Stretch Test
| Feature | Detail |
|---|---|
| Technique | Patient prone. Extend the hip while flexing the knee. A modified version uses approximately 15° hip extension and 135° knee flexion. |
| Positive test | Reproduction of anterior thigh pain or typical upper lumbar radicular symptoms. |
| Best for | L2–L4 radiculopathy. |
| Sensitivity | Approximately 91–95%. |
| Specificity | Approximately 83–100%. |
| L3 value | Likelihood ratio approximately 5.7 for L3 radiculopathy. |
This test is especially important when symptoms are in the groin, anterior thigh, or medial knee, where lumbar radiculopathy may be mistaken for hip or knee pathology.
Slump Test
| Feature | Detail |
|---|---|
| Technique | Patient seated. Ask the patient to slump the spine, flex the neck, then extend the knee and dorsiflex the foot. |
| Positive test | Reproduction of radicular pain or neural symptoms. |
| Sensitivity | Approximately 78–100%, depending on pathology studied. |
| Specificity | Low, approximately 36–38%. |
| Clinical value | Highly sensitive but not very specific. Best interpreted with the rest of the examination. |
Manual Muscle Testing by Level
Motor testing should be performed systematically and compared side-to-side. Weakness is generally more specific than sensitive, meaning that when clear weakness is present it is clinically useful, but normal strength does not exclude radiculopathy.
| Root Level | Muscle / Movement Tested | Technique | Clinical Clue |
|---|---|---|---|
| L2 | Iliopsoas / hip flexion | Patient flexes hip against resistance while seated or supine | Difficulty climbing stairs or rising from a chair |
| L3 | Quadriceps / knee extension | Patient extends knee against resistance | Knee instability, difficulty with sit-to-stand |
| L4 | Tibialis anterior / ankle dorsiflexion | Dorsiflex ankle against resistance or heel walk | Foot slap or weak heel walking |
| L5 | Extensor hallucis longus / great toe extension; hip abductors | Test great toe extension and resisted hip abduction | Foot drop, Trendelenburg-type gait |
| S1 | Gastrocnemius / plantarflexion | Single-leg heel raise or resisted plantarflexion | Difficulty toe walking |
Motor weakness has variable sensitivity, reported around 13–61%, but specificity is moderate to high. Therefore, weakness is more useful when present than when absent.
Reflex Testing by Level
| Root Level | Reflex | How to Test | Clinical Significance |
|---|---|---|---|
| L1 | Cremasteric / Geigel | Stroke inner thigh; observe ipsilateral testicular elevation or lower abdominal contraction | Rarely tested; inconsistent |
| L2 | Patellar / adductor variable | Tap patellar tendon with knee flexed; adductor reflex may be assessed if needed | Depression may suggest L2–L4 involvement |
| L3 | Patellar | Tap patellar tendon with knee flexed | Reduced in 27–100% of L3 cases; useful for midlumbar radiculopathy |
| L4 | Patellar | Tap patellar tendon with knee flexed | Strong localising value; LR approximately 7.7 for L4-specific impingement |
| L5 | Semimembranosus / medial hamstring | Tap medial hamstring tendon | Variable; no consistently reliable L5 reflex |
| S1 | Achilles | Tap Achilles tendon with ankle slightly dorsiflexed | Useful for low lumbar / S1 involvement |
Reflex testing generally has good specificity but variable sensitivity. An abnormal reflex is helpful, but a normal reflex does not exclude radiculopathy.
Sensory Testing
Sensory testing should include pinprick, light touch, and comparison with the opposite side. It should be interpreted cautiously because sensory symptoms may be subjective, patchy, or absent despite clinically significant radiculopathy.
| Root Level | Key Sensory Area |
|---|---|
| L2 | Anterior thigh |
| L3 | Medial knee |
| L4 | Medial ankle / medial malleolus |
| L5 | Dorsum of foot / first web space |
| S1 | Lateral foot / sole |
Useful level-specific findings include:
- L2 anterior thigh sensory change — strong localising value
- L4 medial ankle sensory loss — a particularly useful and relatively specific sign supporting L4 radiculopathy
- L5 dorsum foot or first web-space sensory change — especially helpful when combined with great toe extension weakness
Overall sensory testing has only moderate diagnostic accuracy, with sensitivity around 61% and specificity around 63%. Patients may have paraesthesia without objective sensory loss.
Best Test Combinations for Accuracy
| Clinical Scenario | Useful Combination | Diagnostic Value |
|---|---|---|
| Suspected L2–L4 radiculopathy | Femoral stretch test + patellar reflex | LR approximately 7.0 |
| Suspected midlumbar radiculopathy | Femoral stretch test + sit-to-stand difficulty | Very high diagnostic value |
| General lumbar radiculopathy | SLR + Bragard test | Sensitivity approximately 97.4%; NPV approximately 96.6% |
| Subarticular nerve compression | Two neurological signs corresponding to one root | Sensitivity approximately 71%; specificity approximately 73% |
| Possible L5 radiculopathy | EHL weakness + hip abductor weakness + dorsum foot sensory change | Stronger than dorsiflexion alone |
Practical Clinical Principles
No Single Test Is Definitive
A positive straight leg raise, isolated sensory change, or mild weakness should not be interpreted in isolation. Diagnosis is strongest when multiple findings point to the same nerve root.
Use Level-Appropriate Tests
- L2–L4: femoral nerve stretch test, patellar reflex, quadriceps / hip flexion testing
- L4–S1: straight leg raise, Bragard test, EHL testing, plantarflexion, Achilles reflex
Examine Function, Not Just Isolated Muscles
Functional clues such as heel walking, toe walking, sit-to-stand difficulty, stair climbing, foot drop, and Trendelenburg gait can reveal clinically meaningful weakness.
Correlate With Imaging, but Do Not Be Ruled by Imaging
Clinical examination should guide interpretation of MRI. Imaging findings are common in asymptomatic people, and symptoms may not always match the scan.
Key Message
The best examination for lumbar radiculopathy is pattern-based. Neurodynamic tests, motor testing, reflexes, sensory findings, gait assessment, and imaging correlation must be interpreted together. A coherent clinical pattern is more reliable than any single positive test.